
I was recently presented with the problem of comparing the noise of two alternative designs that were presented to me. Normally that wouldn’t take much sorting out – a few minutes with a SPICE simulator and you would have the answer. That depends on having reliable SPICE models. The first thing I do when embarking on some important noise simulations is check that the models actually include noise and also check they are correct. A simple test circuit in SPICE and comparison with the datasheets showed that while one amplifier simulated noise almost correctly, the other didn’t simulate flicker noise even though it was present. The issue with this particular design was that one amplifier was a chopper amplifier with no flicker noise component and the other was a conventional amplifier with lower midband noise but a flicker noise component which meant that at low frequencies the noise was considerably higher than the chopper amplifier. The problem was how to compare the two because this was a low frequency design.
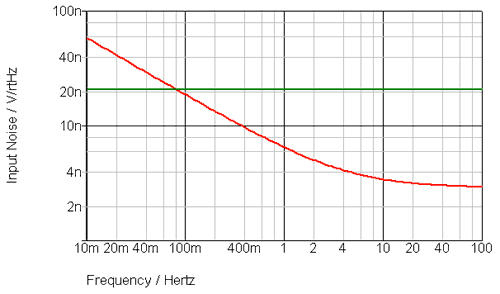
The graph above illustrates the problem. One amplifier is shown in green and the other in red. If you were working above 0.1Hz then the answer would be simple – the red amplifier would be better for noise. However, in this case the operation was intended to be down to 0.01Hz or lower and up to 1Hz so how do you compare the two? I have used a simulator with different amplifiers to produce this graph. In the real case I only had datasheets. One possible solution would be to create your own SPICE model to correct for the deficiencies in the manufacturer’s SPICE models. You need to make sure you get the flicker noise slope and 1/f corner frequency are correct. The other approach is to do some hand calculations using the datasheet information which is what I have done.
The first thing to understand is the nature of noise and what the graphs really mean. Noise is really about “noise power”. In the case of white noise, the flat green trace, it has equal power per Hertz. So, the same noise power is contained in 1Hz to 2Hz as is contained between 10Hz and 11Hz. If you were doing RF design then you might be working in power (e.g. dBm) but for analog design you are usually working with voltages. As power is proportional to voltage squared, the voltage plot is in Volts per root Hertz. If you square that to get something that is proportional to power it would be Volts squared per Hertz. This is important to remember when doing any calculations.
Flicker noise or 1/f noise has equal power per octave or decade. That means that 1Hz to 2Hz contains the same power as 10Hz to 20Hz. So, as the frequency reduces the noise power continues to increase per Hertz as opposed to being constant with white noise. Note that the flicker noise of a complex device is not always a true 1/f curve.
One aspect that may not seem logical is that with the chopper amplifier (green trace) the total noise hardly changes whether you look at 0.1Hz to 10Hz or 0.01Hz to 10Hz. In the first case the bandwidth is 9.9Hz and in the second case the bandwidth is 9.99Hz. So, calculating total noise which is 20.8nV from the graph multiplied by sqrt(9.9) or sqrt(9.99) depending on the bandwidth, the values are virtually identical. In fact if you took the noise from 0Hz to 10Hz it would be almost identical.
The same is not true for the red trace with the flicker noise component. In order to hand calculate the noise from that amplifier from, say 0.01Hz to 1Hz, you must estimate it by breaking it down into small pieces and summing each of the pieces together. The individual pieces must be summed using “sum of squares” as you are summing uncorrelated noise powers.
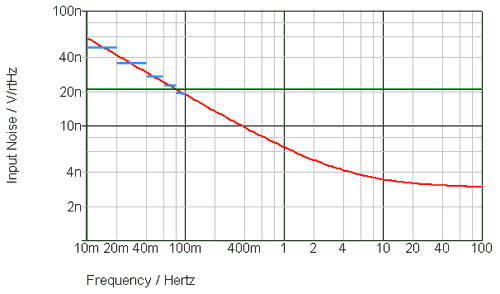
So, taking the example above, I have drawn blue lines where you might take your individual measurements for summing. What you are effectively doing is approximating the red line as a series of interconnected blue lines – a zigzag instead of a smooth curve. So, from 0.01Hz to 0.02Hz the noise is around 50nV/sqrt(Hz) and the bandwidth is 0.01Hz. The next segment is from 0.02Hz to 0.04Hz with a noise of 35nV/sqrt(Hz) and so on. The “sum on squares” means you must calculate sqrt(50n*50n*0.01 + 35n*35n*0.02 …) etc. This is effectively turning the noise voltages into powers over the respective bandwidth, summing them and taking the square root to get back to Volts. The resistance of the “power” calculation is never really used. If you put resistance into the calculations to get true power you will end up with it canceling out when you have finished.
What you will notice in this case is that the noise follows a 1/f characteristic. The first segment power is 50nV2*0.01 which is 25nV2. The next segment is 35nV2*0.02 which is 24.5nV2. The next segment in 25nV2*0.04 which is 25nV2. In other words the noise power is equal per octave.
So, adding in the final segment from 0.08Hz to 0.1Hz you get a sum of square of 82.5 so the square root is 9.08nV RMS. Note that this is an RMS, total noise figure now because we have taken account of the bandwidth.
The noise for the other amplifier will be 20.8nV*sqrt(0.09) which is 6.24nV RMS which is clearly lower. However, that is the obvious part. The next segment from 0.1Hz to 1Hz will give a lower sum of squares based on 16nV, 11nV, 8nV and 6.8nV over 0.1Hz, 0.2Hz, 0.4Hz and 0.2Hz respectively. The square root of the sum of squares from 0.1Hz to 1Hz is therefore 9.2nV RMS. Note that it is the same as the 0.01Hz to 0.1Hz noise because we are still in the flicker noise area – equal power per octave or decade. So, while the spot noise figures are lower from 0.1Hz to 1Hz, the wider bandwidth means the noise contribution is identical. Summing the 9.09nV and 9.2nV, again with the sum of squares, gives 12.9nV RMS.
The noise of the chopper amplifier from 0.01Hz to 1Hz will be 20.8nV*sqrt(0.99) which is 20.7nV RMS. So, in this case the chopper amplifier has higher noise.
Peak to Peak or RMS
You will usually see low frequency noise quoted as a peak to peak value from 0.1Hz to 10Hz. This can be tricky to confirm because if you look on an oscilloscope and take 10 readings of the same noise you will get 10 different values. A Guassian noise source will have a finite probability of exceeding a certain value based on the RMS value. I tend to use a factor of 5x which means that a 1V RMS noise source will exceed 5V peak to peak around 1% of the time. Some texts use a factor of 6x for an even lower probability.
You can find a more detailed explanation of this piecewise technique in the National Semiconductor application note AN-104 “Noise Specs Confusing?” (now part of Texas Instruments). This is now called SNVA515C by Texas Instruments.